最近看到CoordinatorLayout的一些效果和之前需要做的效果一样,CoordinatorLayout也是Material Degisn里面的一个控件。就写了下来。这里简单记录一下CoordinatorLayout的简单使用。
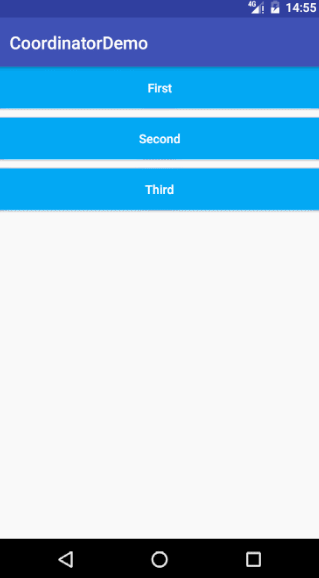
效果图
下面看一下效果
简单效果图
实践效果图
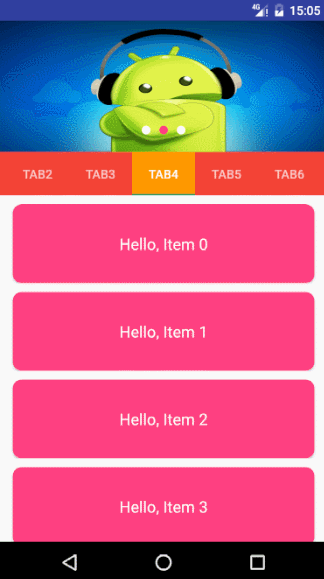
实践效果图是之前一个需求里面用到过,当时没有用CoordinatorLayout,费了大劲了。这种效果现在也很常见,用CoordinatorLayout很容易实现。
这里面用了ViewPager, TabLayout, RecyclerView, CardView, Toolbar, CoorinatorLayout,也算是把这些都做个练习吧。
下面简单实现下效果
效果实现
效果一:
布局
1
2
3
4
5
6
7
8
9
10
11
12
13
14
15
16
17
18
19
20
21
22
23
24
25
26
27
28
29
30
31
32
33
34
35
36
37
38
39
| <?xml version="1.0" encoding="utf-8"?>
<android.support.design.widget.CoordinatorLayout
xmlns:android="http://schemas.android.com/apk/res/android"
xmlns:app="http://schemas.android.com/apk/res-auto"
android:id="@+id/coordinaotr_layout"
android:layout_width="match_parent"
android:layout_height="match_parent"
android:fitsSystemWindows="true"//注意
>
<android.support.design.widget.AppBarLayout
android:layout_width="match_parent"
android:layout_height="100dp"
android:theme="@style/ThemeOverlay.AppCompat.Dark.ActionBar">
<android.support.v7.widget.Toolbar
android:id="@+id/tool_bar"
android:layout_width="match_parent"
android:layout_height="?attr/actionBarSize"
android:background="@color/green"
app:layout_scrollFlags="scroll|enterAlways"//注意
app:popupTheme="@style/ThemeOverlay.AppCompat.Light">
</android.support.v7.widget.Toolbar>
<TextView
android:layout_width="match_parent"
android:layout_height="match_parent"
android:text="Hello"
android:gravity="center_vertical"
android:textColor="@color/white"
android:textSize="18sp"/>
</android.support.design.widget.AppBarLayout>
<android.support.v7.widget.RecyclerView
android:id="@+id/recycler_view"
android:layout_width="match_parent"
android:layout_height="wrap_content"
app:layout_behavior="@string/appbar_scrolling_view_behavior">//注意</android.support.v7.widget.RecyclerView>
</android.support.design.widget.CoordinatorLayout>
|
代码
这里代码就不贴了,只是一些findViewById,之后设置显示RecyclerView。重点是布局,布局写好就基本可以实现效果了。
效果二
布局
1
2
3
4
5
6
7
8
9
10
11
12
13
14
15
16
17
18
19
20
21
22
23
24
25
26
27
28
29
30
31
32
33
34
35
36
37
38
39
40
41
42
43
44
45
46
47
48
49
50
51
52
53
54
55
56
57
58
59
60
61
62
63
| <?xml version="1.0" encoding="utf-8"?>
<android.support.design.widget.CoordinatorLayout
xmlns:android="http://schemas.android.com/apk/res/android"
xmlns:app="http://schemas.android.com/apk/res-auto"
android:id="@+id/coorinator_layout"
android:layout_width="match_parent"
android:layout_height="match_parent"
android:fitsSystemWindows="true"//注意
>
<android.support.design.widget.AppBarLayout
android:layout_width="match_parent"
android:layout_height="300dp"
android:theme="@style/ThemeOverlay.AppCompat.Dark.ActionBar">//注意
<android.support.design.widget.CollapsingToolbarLayout
android:id="@+id/collapsing_toolbar"
android:layout_width="match_parent"
android:layout_height="match_parent"
app:contentScrim="@color/white"
app:expandedTitleMarginEnd="64dp"
app:expandedTitleMarginStart="48dp"
app:layout_scrollFlags="scroll|exitUntilCollapsed">//注意
<android.support.v7.widget.Toolbar
android:id="@+id/tool_bar"
android:layout_width="match_parent"
android:layout_height="?attr/actionBarSize"
android:background="@color/colorAccent"
android:fitsSystemWindows="true"//注意
app:layout_scrollFlags="scroll|enterAlways"//注意
app:popupTheme="@style/ThemeOverlay.AppCompat.Light">//注意
</android.support.v7.widget.Toolbar>
<LinearLayout
android:id="@+id/tool_bar_1"
android:layout_width="match_parent"
android:layout_height="150dp"
android:background="@color/teal"
android:orientation="vertical"
app:layout_scrollFlags="scroll|enterAlways"//注意
app:popupTheme="@style/ThemeOverlay.AppCompat.Light">
<ImageView
android:layout_width="wrap_content"
android:layout_height="45dp"
android:src="@mipmap/ic_launcher"/>
<TextView
android:layout_width="wrap_content"
android:layout_height="wrap_content"
android:text="Hello"/>
</LinearLayout>
</android.support.design.widget.CollapsingToolbarLayout>
</android.support.design.widget.AppBarLayout>
<android.support.v7.widget.RecyclerView
android:id="@+id/recycler_view"
android:layout_width="match_parent"
android:layout_height="match_parent"
app:layout_behavior="@string/appbar_scrolling_view_behavior">//注意</android.support.v7.widget.RecyclerView>
</android.support.design.widget.CoordinatorLayout>
|
代码
其他代码同效果一,这里只是使用了CollapsingToolbar的一些属性设置。如下:
1
2
3
| mCollapsingToolbarLayout.setTitle("Kevin");
mCollapsingToolbarLayout.setExpandedTitleColor(ContextCompat.getColor(SecondActivity.this, R.color.white));
mCollapsingToolbarLayout.setStatusBarScrimColor(ContextCompat.getColor(SecondActivity.this, R.color.colorAccent));
|
效果三
1
2
3
4
5
6
7
8
9
10
11
12
13
14
15
16
17
18
19
20
21
22
23
24
25
26
27
28
29
30
31
32
33
34
35
36
37
38
39
40
41
42
43
44
45
46
47
48
49
50
51
| <?xml version="1.0" encoding="utf-8"?>
<android.support.design.widget.CoordinatorLayout
xmlns:android="http://schemas.android.com/apk/res/android"
xmlns:app="http://schemas.android.com/apk/res-auto"
android:id="@+id/coorinator_layout"
android:layout_width="match_parent"
android:layout_height="match_parent"
android:background="@android:color/background_light"
android:fitsSystemWindows="true"//注意
android:orientation="vertical">
<android.support.design.widget.AppBarLayout
android:id="@+id/app_bar_layout"
android:layout_width="match_parent"
android:layout_height="200dp"
android:fitsSystemWindows="true"
android:theme="@style/ThemeOverlay.AppCompat.Dark.ActionBar">
<android.support.design.widget.CollapsingToolbarLayout
android:id="@+id/collapsing_toolbar"
android:layout_width="match_parent"
android:layout_height="match_parent"
app:expandedTitleMarginEnd="64dp"
app:expandedTitleMarginStart="48dp"
app:layout_scrollFlags="scroll|exitUntilCollapsed">//注意
<ImageView
android:id="@+id/iv_header_view"
android:layout_width="match_parent"
android:layout_height="match_parent"
android:fitsSystemWindows="true"//注意
android:scaleType="centerCrop"
android:src="@drawable/slideimage1"
app:layout_collapseMode="parallax"/>//注意
<android.support.v7.widget.Toolbar
android:id="@+id/tool_bar"
android:layout_width="match_parent"
android:layout_height="?attr/actionBarSize"
app:layout_collapseMode="pin"//注意
app:popupTheme="@style/ThemeOverlay.AppCompat.Light"></android.support.v7.widget.Toolbar>
</android.support.design.widget.CollapsingToolbarLayout>
</android.support.design.widget.AppBarLayout>
<android.support.v7.widget.RecyclerView
android:id="@+id/recycler_view"
android:layout_width="match_parent"
android:layout_height="match_parent"
app:layout_behavior="@string/appbar_scrolling_view_behavior">//注意</android.support.v7.widget.RecyclerView>
</android.support.design.widget.CoordinatorLayout>
|
代码
这里仍然贴出区别的代码
1
2
3
4
5
6
7
8
9
10
11
12
13
14
15
16
17
18
19
20
21
22
23
24
25
26
27
28
| mToolbar.setOnMenuItemClickListener(this);
mToolbar.setNavigationOnClickListener(new View.OnClickListener() {
@Override
public void onClick(View view) {
finish();
}
});
@Override
public boolean onMenuItemClick(MenuItem item) {
switch (item.getItemId()) {
case R.id.message:
Snackbar.make(mCoordinatorLayout, "Message", Snackbar.LENGTH_SHORT).show();
break;
case R.id.share:
Snackbar.make(mCoordinatorLayout, "Share", Snackbar.LENGTH_SHORT).show();
break;
case R.id.settings:
Snackbar.make(mCoordinatorLayout, "Settings", Snackbar.LENGTH_SHORT).show();
break;
default:
break;
}
return false;
}
|
对比总结
贴了这么多布局代码,发现都一样,只是里面的小区别,正是这些小区别,改变了不同的效果
可以看到我在布局中都添加了“//注意”的标识,这些地方是关键,影响着我们的效果是否能够实现。
1
| android:fitsSystemWindows="true"
|
1
| app:layout_scrollFlags="scroll|enterAlways"
|
enterAlways、enterAlwaysCollapsed、exitUntilCollapsed他们会决定什么时候滚动,怎么滚动
1
2
| app:layout_collapseMode="parallax"
app:layout_collapseMode="pin"
|
可以看到效果三布局ImagView和Toolbar分别设置了这个属性,导致了图片有视差效果,Toolbar滑动顶部会固定。
1
| app:layout_behavior="@string/appbar_scrolling_view_behavior"
|
这个是重点,没有添加behavior,那么会发现RecyclerView不会沉在AppBarLayout的下面,而且这个界面不会滚动。
所以要实现效果一定要加layout_behavior属性,实现什么样的behavior就要使用不同的behavior。
这个官方提供的也就那么几种,如果你有更多需求,那只能自己定义了
这些控件记录细了也是无用,没用过的个人感觉直接上手写两遍,有什么区别,把属性写入代码对比下效果便知。因此到底什么区别就不细说了。说也说不清楚,都是废话。
Demo下载
####下载一
下载二(github)

